Monday, November 7, 2016

Monday, March 28, 2016
Gedünsteter Lachs mit Ingwer/Zitrone und scharfen Süsskartoffel Fritten
Super einfaches, schnelles Lachsrezept, hier wie es geht:
Zutaten:
- grosses Lachsfilet
- Süsskartoffel(n)
- Knoblauch
- Ingwer
- Olivenöl
- Gewürze: Salz, Pfeffer, Chilli, Paprika, geriebene Muskatnuss

schälen ...

in Scheiben schneiden ...

grob würfeln ...

und den Knoblauch pellen ...

alles in eine Schüssel geben ...

und kräftig würzen, mit gut Chilli anmachen, dann ordentlich Olivenöl dazu...

und ein bisschen Muskatnuss drüber reiben ...

umrühren, und auf ein Backblech geben ...

Den Lachs auf ein Stück Alufolie geben ...

und mit dem Ingwer und Zitronen belegen, Pfeffer, Salz und ...

etwas Olivenöl ...

einpacken und mit dem Backblech Süsskartoffeln in den
auf 200 C vorgeheizten Backofen packen.

nach 15 Minuten die Süsskartoffeln wenden, nach 25 Minuten
nochmal wenden und den Ofen auf "Grillen/Überbacken" stellen.
Nach insgesamt 30 Minuten ist alles fertig

Und jetzt ab auf den Teller und schmecken lassen.

Guten Appetit!
2 Portionen, ungefähr 10 Minuten Zubereitungszeit plus 30 Minuten Backofen.
Wednesday, June 17, 2015
Leckere Polenta Pfannekuchen mit Waldbeeren-Quark und Minze #postworkout #foodporn

Leckere Polenta Pfannekuchen mit Waldbeeren-Quark und Minze #postworkout #foodporn
Heute möchte ich ein leckeres
Rezept mit Euch teilen. Lecker, sehr Gehaltvoll und in ca. 10 Minuten
fertig zubereitet. Super als Postworkout-Mahlzeit.

Pfannekuchenteig (für ca. 3 Pfannekuchen):
- 2 Eier
- eine Prise Salz
- ein halbes Tütchen Backpulver
- einen Esslöffel Stevia Süsse (wer will kann auch Honig nehmen)
- 3 Esslöffel Polenta Maismehl (ist einfach nur feiner gemahlener Maisgries, besser zum backen, gibts im Bio Laden)
- 1 Esslöffel Vollkorn Weizenmehl
- nach belieben 1 Esslöffel Whey (Protein Pulver Deiner Wahl)
- ca. 1/4 Liter fettarme Milch
- ein bisschen Kokosöl zum ausbacken in der Pfanne
Quark:
- Waldbeeren Mix (Tiefkühl oder besser noch frisch)
- 250 gr Magerquark
- 1 Esslöffel Stevia Süsse (wer will kann auch Honig nehmen)
- ein Schuss Milch
- ein paar frische Minzblätter zur Garnitur
Gerätschaften:
- Schüssel
- Stabmixer
- (Schüttel-) Shaker
Zubereitung:

Den Quark in eine Schüssel geben. Eine handvoll Waldbeeren Mix dazu. Stevia Süsse.

Mit dem Stabmixer und ein bisschen Milch cremig mixen. Dann in den Kühlschrank stellen.

Für den Teig die 2 Eier in den Shaker aufschlagen. Backpulver, Salz, Süsse, Whey, Polentamehl+Vollkornmehl mit der Milch zusammengeben und kräftig 5 Minuten lang schütteln bis ein glatter, recht flüssiger Teig einstanden ist.

Den kann man dann direkt aus dem Shaker in die Pfanne portionieren.

Die Kochplatte für die Pfanne auf höchste Heizstufe einstellen (bei mir ist das 9). Dann die Pfannekuchen hellbraun von beiden Seiten ausbacken.
Mit dem Beeren-Quark und der Minze auf einem Teller anrichten. Fertig und SUPER lecker. Genau das richtige nach einem intensiven Workout.

Viel Spass beim nachkochen! Lasst es euch schmecken :)
Tuesday, May 27, 2014
Install and run a full functional VMware ESX Hypervisor within a KVM virtual machine

This post is about how to setup and configure a VMware ESX Hypervisor within a KVM virtual machine. The resulting ESX Host is going to be fully functional allowing to create (nested) virtual machines with a working network connection.

Some (funny) facts:
- Running VMware ESX within a KVM virtual machine allow memory over-commitment. That means even if your KVM Host system only has 2 GB memory you can assign e.g. 4 GB memory to the ESX Host VM.
- KVM provides the hardware requirements for VMware ESX even if ESX does not supports the KVM Hosts hardware e.g. it allows to install and run a VMware ESX system on almost any kind of Desktop hardware which is normally not supported by ESX e.g. because of an unsupported network card model.
Steps to setup VMware ESX within a KVM VM
- Install Linux on a physical system (I used latest Ubuntu 14.04)
- Install the qemu/kvm package
- Edit /etc/modprobe.d/kvm-intel (or kvm-amd for AMD cpus) and add
options kvm ignore_msrs=1
options kvm-intel nested=y ept=y
- Download qemu-2.0.0 from http://wiki.qemu.org/Download and apply the following patch to hw/i386/pc_piix4.c line 206. Change
0x4);
to
pc_basic_device_init(isa_bus, gsi, &rtc_state, &floppy, TRUE,
0x4);
- Configure the qemu 2.0.0 source with the following command:
- Create /usr/local/etc/qemu/bridge.conf
- Install the bridge-utils package
- Configure a network bridge in /etc/network/interfaces as following:
iface br0 inet static
address 192.168.88.135
netmask 255.255.255.0
network 192.168.88.0
broadcast 192.168.88.255
gateway 192.168.88.1
dns-nameservers 192.168.88.1
bridge_ports eth0
bridge_fd 0
bridge_hello 2
bridge_maxage 12
bridge_stp off
Please notice that your ip-configuration may be different
- Choose a directory for the KVM virtual machine and create the virtual machine harddisk with the following qemu-img command:
- Download VMware ESX Hypervisor 5.5 from the VMware website and put the install iso file (VMware-VMvisor-Installer-5.5.0.update01-1623387.x86_64.iso) into the same directory as the harddisk file was created a step before
- Start the KVM virtual machine with:
Please notice the "vmxnet3" virtual network device type!
- Go through the (normal) VMware ESX installation procedure
- After the installation enable the SSH service on the ESX Host with is now running with the KVM VM. Then ssh into the ESX Host and set the following two parameters in /etc/vmware/config:
hv.assumeEnabled="TRUE"
Now please reboot the ESX Host system to activate the new configuration!
- When creating a virtual machine on the (nested virtualized) ESX Host please make sure to add the following two parameters to the VM's vmx configuration file:
vhv.enable = "TRUE"
vmx.allowNested = "TRUE"
Congratulations!
You have successfully virtualized a VMware ESX Hypervisor with KVM!
I hope you now enjoy your fully functional VMware ESX Host
Additional informations on the VMware parameters used in this howto
- vhv.allow = "TRUE" does nothing on ESX 5.1 and later
- vhv.enable = "TRUE" is only going to be useful if you want to run VMs under the VMs running under ESXi running under kvm
- You can add vmx.allowNested = "TRUE" to /etc/vmware/config in the ESXi VM to avoid having to put it in every nested VM's configuration file.
This quick howto was created with informations from https://communities.vmware.com/thread/451412
Special thanks to jmattson for the additional details on the VMware parameters
Special thanks to jmattson for the additional details on the VMware parameters
Friday, April 4, 2014
A working OpenStack configuration for a single network card
After some longer trouble to get OpenStack running on a system which just has one network card I found a proper solution.

Here it is:
- Install a fresh Ubuntu 12.04 LTS
- Install bridge-utils and configure a br100 bridge on your single network card eth0
- Here the config part for br100 in /etc/network/interfaces
# Internal Network
auto br100
iface br100 inet static
address 192.168.0.1
netmask 255.255.255.0
network 192.168.0.0
broadcast 192.168.0.255
gateway 192.168.0.1
bridge_ports eth0
bridge_fd 0
bridge_hello 2
bridge_maxage 12
bridge_stp off
- Create a VLAN network interface on eth0 using VLAN ID 0
- Run:
modprobe 8021q
vconfig add eth0 0
ifconfig eth0.0:1 10.11.12.1 netmask 255.255.255.0 up
echo 1 > /proc/sys/net/ipv4/ip_forward
echo 1 > /proc/sys/net/ipv4/conf/eth0/proxy_arp
iptables -t nat -A POSTROUTING -o eth0 -j MASQUERADE
- This creates a eth0.0 device with the ip 10.11.12.1
- Check that the new eth0.0 device got created with "ifconfig -a"
- Now follow the regular Devstack instructions
- Add a stack user with sudo permissions
- Check out OpenStack with git
- Create a /home/stack/devstack/localrc as following
HOST_IP=192.168.0.1
FLOATING_RANGE=192.168.0.0/24
FIXED_RANGE=10.11.12.0/24
FIXED_NETWORK_SIZE=256
FLAT_INTERFACE=eth0
ADMIN_PASSWORD=password
MYSQL_PASSWORD=password
RABBIT_PASSWORD=password
SERVICE_PASSWORD=password
SERVICE_TOKEN=password
LOGFILE=/home/stack/stack.sh.log
- Now run stack.sh
su - stack
cd devstack
./stack.sh
Shortly after that OpenStack will be up + running and you can connect to the OpenStack Horizion Dashboard at http://192.168.0.1
With this network configuration this setup allows to successfully launch OpenStack instances which are then reachable from the controller.
Devstack, a documented shell script to build complete OpenStack development environments. More about Devstack at: http://devstack.org
Sunday, February 23, 2014
Ultra secure remote access to home network with a raspberry pi
This post is about setting up an ultra secure remote access to home- (or a cooperated) network with a raspberry pi.
We have all heard of the security holes in many DSL routers. Because of that it is important to keep the firmware up2date. Anyway I personally do not really trust the "remote-access" capabilites and the eventual built-in VPN functionalities of those DSL boxes.
Still, eventually I would like to get remote access to e.g. my home network. The idea is to use a raspberry pi as secure bridge into the remote network.
Sure, we can setup VPN on the raspberry pi, anyway most raspberry related VPN howtos require a "logmein" account for an easy VPN setup. I personally prefer to use standard utilities without the need to create an account on a commercial site with all my traffic routed to that site. Also, for me pure "ssh" access is completely sufficiant. This enables the capability for remote-port-forwarding through ssh which is enough for me.
But for any "port-forwarding" on the DSL router at least one open TCP port would be required, how bad!
... but wait, here the "better" idea:
We can use an "active port forwarder" (such as "afp-server/afp-client) to forward the ssh port of the raspberry pi to a remote server (accessible in the internet) through the outgoing connection/communication.
Here how this basically looks like :

The raspberry pi creates a outgoing connection (allowed through the firewall) to the remote server using "afclient". On the remote server "afserver" picks up this connection and uses it to actively foward the ssh port of the raspberry pi to a port on the remote server.
-> This setup does not even require a single open port on the DSL router!
Howto configure the raspberry pi for "Ultra secure remote access":
- Setup a raspberry pi with the standard raspian OS image.
- install "apf-client"
- make the apf-client (afclient is the binary name) automatically at startup.
afclient --ignorepkeys -m 50001 --pass [secure-password] -n [remote-public-server] -p 22 --ar-start --ar-quit
I am using the port 50001 for the af-communication in this example.
This will connect to a "afserver" on [remote-public-server] via port 50001 using a SSL encryted comminication secured by [secure-password]
Please notice:
The "--ar-start --ar-quit" parameters allowing the afclient to start even when the afserver on the remote server is not accessible or not started yet. In case the network the raspberry pi is located in does not allow direct internet access the afclient/afserver also supports tunneling the af-connection to standard http/https proxy server. For more options please check http://manpages.ubuntu.com/manpages/precise/man1/afserver.1.html
Now the setup on the remote (public accessible) server:
- Install "apf-server" (afserver is the binary name)
- Start "afserver" to allow and pick up the connection from the client
afserver -m 50001 --pass [secure-password] -l 40001
This picks up the afclient on port 50001 and forwards the ssh port from the raspberry pi to port 40001 on the remote (public accessible) server using the same password as given for the afclient.
-> you can now ssh to port 40001 on the remote (public accessible) server which will login to the raspberry pi!
From there you can e.g. use "wakeuponlan" to power on systems in the remote network.
More security for this setup:
- install "failtoban" on the raspberry pi to harden the ssh login - http://www.fail2ban.org/
- disable "root" ssh-access to the raspberry pi and only permit to use ssh-keys (not passwords)
- use "iptables" to secure the remote forwarded ssh port on the remote (public accessible) server.
/sbin/iptables -A INPUT -p tcp -m tcp -s [the-IP-address-from-where-you-come-from] --dport 40001 -j ACCEPT
/sbin/iptables -A INPUT -p tcp -m tcp -s 0.0.0.0/0 --dport 40001 -j DROP
- only start the "afserver" when you need it. When it is not start the forwarded ssh port of the raspberry pi won't be picked up so it won't be accessible.
Hope its useful for you! Security IS important!
Wednesday, January 22, 2014
What a MP3 player and Cloud Computing have in common

When thinking of IaaS Cloud Computing most of the time it is like a MP3 player. You can easily let users create and start, stop and destroy their own VMs and ... not really much more.
If this is not enough for you
or
If you like Cloud but still would like to deploy your systems (VMs and "bare-metal") in a regular (non-AMI) way
or
If you are looking for 100% IT service automation including automatic highavailability, automatic monitoring, automatic backup+restore, automatic IT-documentation, automatic DNS/Network/DNS/DHCP/VLAN management, automatic out-of-band management (including Green IT), automatic application deployment and configuration etc.
... then you should take a look at the openQRM Enterprise datacenter infrastructure and IaaS Cloud Computing solution!
Compared to the MP3 player you can think of openQRM as a full featured Music-Studio application. It can play all kinds of music files (not just MP3s), it lets you record, cut, paste and re-arrange different tracks and song parts, it gives you full control and lets you adjust every bit and pinch of the songs you play and provides you with "super hero power" for your complete music collection.
openQRM Enterprise Datacenter Infrastructure is the "magic potion" for system administrators. It provides a generic Server deployment work-flow which integrates and combines common and custom system administration tools and solutions into a powerful single management console for your complete IT-service Infrastructure; from "A" as in Ansible to "Z" as in Zabbix.
On top of that openQRM Enterprise IaaS Cloud Automation turn your existing openQRM Enterprise Datacenter Infrastructure into a flexible and 100% automated private, public and hybrid Cloud Computing environment including an user-friendly "VM and Bare-Metal Server" Self-Service - no matter which virtualization, storage or network technologies you use.
More infos at http://www.openqrm-enterprise.com/
Monday, January 20, 2014
Was ein MP3-Player und Cloud Computing gemeinsam haben

Oftmals ist IaaS Cloud Computing wie ein MP3-Player. Man kann einfach Benutzern ermöglichen ihre eigenen VMs zu erstellen, zu starten/stoppen und zu entfernen ... und nicht wirklich viel mehr.
Wenn das für Sie nicht genug ist
oder
Wenn Sie nach einer Cloud Lösung suchen, die Ihre Systeme (VMs und "bare-metal") in einer herkömmlichen Weise (nicht AMI Image basiert) bereitstellt.
oder
Wenn Sie es auf eine 100% automatisierte IT-Service Umgebung abgesehen haben die automatische Hochverfügbarkeit, automatische System- und Service Überwachung, automatisches Backup/Wiederherstellung , automatische IT-Dokumentation, automatisches DNS / Netzwerk / DNS / DHCP / VLAN-Management , automatisches Out-of-Band Mangement (einschließlich Green IT) und automatische Anwendungsbereitstellung und Konfiguration bietet
... dann sollten Sie einen Blick auf die openQRM Enterprise Datacenter-Infrastruktur und IaaS Cloud Computing Lösung werfen!
Im Vergleich zum MP3-Player kann man sich openQRM als voll ausgestattete Ton-Studio Musik Anwendung vorstellen, die alle Arten von Musikdateien abspielen kann und mit der man aufnehmen, zuschneiden und neu mixen kann. Es gibt Ihnen die volle Kontrolle über jedes Bit, jeden Takt und jede Note Ihrer Songs und macht Sie zum "Super Helden" Ihrer komplette Musiksammlung.
openQRM Enterprise Datacenter-Infrastruktur ist der "Zaubertrank" für Systemadministratoren. Es bietet einen generischen Server-Bereitstellungs Work-Flow der unabhängig von der Virtualisation Technologie auch physikalische Systeme ("bare-metal") voll unterstützt. Zudem beinhaltet openQRM Enterprise Datacenter-Infrastruktur eine Integration mit Standard Systemadministrations-Werkzeugen die zusammen mit eigenen Tools in einer leistungsfähigen Management-Konsole für Ihre komplette IT-Service Infrastruktur zusammengefasst werden, von "A" wie in Ansible bis "Z" wie in Zabbix.
Als Aufsatz für openQRM Enterprise Datacenter-Infrastruktur verwandelt openQRM Enterprise IaaS Cloud Datacenter Automation Ihre IT Umgebung in ein flexibles, zu 100% automatisiertes Selbstbedienungs-Portal für VM- und "bare-metal" Systeme, unabhängig welche Virtualisierungs- oder Storage-Technologie Sie verwenden.
Mehr Infos unter http://www.openqrm-enterprise.com/
(cliparts von http://openclipart.org)
Wednesday, November 13, 2013
In love with my new beauty
This is my new beauty! A self-made
fretless Cigar Box Guitar (CBG) built on my own from spare parts the last weeks.

And here how it sounds. Enjoy
the sloppy blues impro.
Some more pictures of the my beauty


... 3 Strings are just enough!
You want to hear some really funky Cigar Box Guitar Blues sound proving that 3 strings are just enough ??
please check Justin Johnson's "Rooster Blues"
please check Justin Johnson's "Rooster Blues"
Pleae find more Informations about Cigar Box Guitars at http://www.cigarboxnation.com/
Enoy!
Sunday, July 29, 2012
Just because it IS possible ...
 Booting from the Telekom Cloud Storage
... I just booted one of our physical server here directly from the German Telekom Cloud Storage Service aka "Mediacenter".
Wednesday, July 18, 2012
Steve Mann got physical assault by McDonald's for wearing Digital Eye Glass
Steve Mann, the father and inventor of "wearable computers" got physical assault by McDonald's for wearing Digital Eye Glass.
Mhmmm ... I used to got to MC like this

Mhmmm ... I used to got to MC like this

Should I worry ?
Please find a full description of my wearable computer at http://www.openmosixview.com/wearable/
Friday, July 6, 2012
Our new TV is running Linux!
We have just bought a new TV set. Happy that it has WLAN and Network so I connected it to our home-network. A quick "nmap" run on the IP address of the TV shows "x86_64-unknown-linux-gnu" as its OS (please see the log output below)
Great, our TV is running Linux. Smoooth ....
.... and since it has an IP address it is now already automatically documented by I-doit in my personal openQRM.
mhmmmm :) ... so, it is actually an open-source GPL firmware/operating system on this TV ... and were I can download it to enable the sshd daemon for login in ?
I could have also titled this blog entry as
"Why Linux on the Desktop will not happen".
The reason for why Linux on the Desktop will not happen is because it is already there. Linux has already arrived for the average Users on Smartphones, Tablets, DSL Routers, even TVs and many more other gadgets.
Here the nmap log output:
root@cloud:/var/log# nmap -vvv -O --osscan-guess 192.168.88.133

Starting Nmap 5.00 ( http://nmap.org ) at 2012-07-05 20:57 CEST
NSE: Loaded 0 scripts for scanning.
Initiating ARP Ping Scan at 20:57
Scanning 192.168.88.133 [1 port]
Completed ARP Ping Scan at 20:57, 0.08s elapsed (1 total hosts)
Initiating Parallel DNS resolution of 1 host. at 20:57
Completed Parallel DNS resolution of 1 host. at 20:57, 0.00s elapsed
DNS resolution of 1 IPs took 0.00s. Mode: Async [#: 1, OK: 0, NX: 1, DR: 0, SF: 0, TR: 1, CN: 0]
Initiating SYN Stealth Scan at 20:57
Scanning 192.168.88.133 [1000 ports]
Discovered open port 443/tcp on 192.168.88.133
Discovered open port 4443/tcp on 192.168.88.133
Discovered open port 80/tcp on 192.168.88.133
Discovered open port 6000/tcp on 192.168.88.133
Discovered open port 9090/tcp on 192.168.88.133
Discovered open port 7676/tcp on 192.168.88.133
Completed SYN Stealth Scan at 20:57, 2.69s elapsed (1000 total ports)
Initiating OS detection (try #1) against 192.168.88.133
Host 192.168.88.133 is up (0.0057s latency).
Scanned at 2012-07-05 20:57:33 CEST for 4s
Interesting ports on 192.168.88.133:
Not shown: 994 closed ports
PORT     STATE SERVICE
80/tcp   open  http
443/tcp  open  https
4443/tcp open  pharos
6000/tcp open  X11
7676/tcp open  unknown
9090/tcp open  zeus-admin
MAC Address: 48:44:F7:BB:F6:89 (Unknown)
Device type: general purpose
Running: Linux 2.6.X
OS details: Linux 2.6.17 - 2.6.28
TCP/IP fingerprint:
OS:SCAN(V=5.00%D=7/5%OT=80%CT=1%CU=41499%PV=Y%DS=1%G=Y%M=4844F7%TM=4FF5E3A1
OS:%P=x86_64-unknown-linux-gnu)SEQ(SP=C6%GCD=1%ISR=D2%TI=Z%CI=Z%II=I%TS=8)O
OS:PS(O1=M5B4ST11NW5%O2=M5B4ST11NW5%O3=M5B4NNT11NW5%O4=M5B4ST11NW5%O5=M5B4S
OS:T11NW5%O6=M5B4ST11)WIN(W1=16A0%W2=16A0%W3=16A0%W4=16A0%W5=16A0%W6=16A0)E
OS:CN(R=Y%DF=Y%T=40%W=16D0%O=M5B4NNSNW5%CC=Y%Q=)T1(R=Y%DF=Y%T=40%S=O%A=S+%F
OS:=AS%RD=0%Q=)T2(R=N)T3(R=Y%DF=Y%T=40%W=16A0%S=O%A=S+%F=AS%O=M5B4ST11NW5%R
OS:D=0%Q=)T4(R=Y%DF=Y%T=40%W=0%S=A%A=Z%F=R%O=%RD=0%Q=)T5(R=Y%DF=Y%T=40%W=0%
OS:S=Z%A=S+%F=AR%O=%RD=0%Q=)T6(R=Y%DF=Y%T=40%W=0%S=A%A=Z%F=R%O=%RD=0%Q=)T7(
OS:R=Y%DF=Y%T=40%W=0%S=Z%A=S+%F=AR%O=%RD=0%Q=)U1(R=Y%DF=N%T=40%IPL=164%UN=0
OS:%RIPL=G%RID=G%RIPCK=G%RUCK=G%RUD=G)IE(R=Y%DFI=N%T=40%CD=S)

Uptime guess: 0.060 days (since Thu Jul  5 19:31:43 2012)
Network Distance: 1 hop
TCP Sequence Prediction: Difficulty=198 (Good luck!)
IP ID Sequence Generation: All zeros

Read data files from: /usr/share/nmap
OS detection performed. Please report any incorrect results at http://nmap.org/submit/ .
Nmap done: 1 IP address (1 host up) scanned in 4.58 seconds
           Raw packets sent: 1029 (46.036KB) | Rcvd: 1017 (41.439KB)
root@cloud:/var/log#
Sunday, November 13, 2011
... simple dependencies
Some facts about running datacenters and web services
Today I would like you to "start from the scratch" when looking at your datacenter services!
Starting from the upper endpoint, the end-user of your service, I will go down and list the dependencies of the service from one step to the next.
Please notice that those dependencies are also true for any type of Cloud Computing services!
Dependencies:
Conclusion:
Lessons learnt:
If any kind of the service configuration and/or data is "stored" locally on the physical systems (the Virtualization host) a failure of the hardware will also cause a failure (and possible outage) of the service.
About "physical hardware" in our Universe:
Everything (i really mean everything) in this Universe is constantly changing. The only thing which is not changing is that everything IS changing. This means every physical system will break at some point in time!
... or lets rephrase it via Murphy's law:
Solution:
Very easy!
Make absolutely sure that no bit of data belonging to the service is stored locally on physical systems (Virtualization Hosts). Avoid binding any of your services (software only) to physical server (hardware)!
Enjoy,
Matt
Today I would like you to "start from the scratch" when looking at your datacenter services!
Starting from the upper endpoint, the end-user of your service, I will go down and list the dependencies of the service from one step to the next.
Please notice that those dependencies are also true for any type of Cloud Computing services!
Dependencies:
- End-user (Person)
- The Request (Software)
- IP-address and Port (Software)
- Operating System (Software)
- A Virtual Machine (Software)
- Physical Systems (physical Hardware!)
Conclusion:
- Datacenter services should be high-availabe.
- The actual service is "software" only.
- The service sadly still depends on "hardware" (even if virtualized).
- ... and hardware will break at some point in time
Lessons learnt:
If any kind of the service configuration and/or data is "stored" locally on the physical systems (the Virtualization host) a failure of the hardware will also cause a failure (and possible outage) of the service.
About "physical hardware" in our Universe:
Everything (i really mean everything) in this Universe is constantly changing. The only thing which is not changing is that everything IS changing. This means every physical system will break at some point in time!
... or lets rephrase it via Murphy's law:
Rule 1) Don't trust faulty hardware.
Rule 2) All hardware is faulty.
Solution:
Very easy!
Make absolutely sure that no bit of data belonging to the service is stored locally on physical systems (Virtualization Hosts). Avoid binding any of your services (software only) to physical server (hardware)!
Enjoy,
Matt
openQRM 4.9 released - Cloud Zones, native VMware ESX support and more
With Cloud Zones, native VMware vSphere/ESX support and lots of improvements to the base system and plugins, openQRM 4.9 opens up new dimensions in professional datacenter management.
These are the highlights of the new version:
- Cloud Zones
Implement Cloud Computing services across multiple datacenter locations, each running their own openQRM infrastructure - seamlessly managed with a new infrastructure layer on top of it all. - Rewritten VMware vSphere/ESX support
openQRM now natively manages VMware ESX(i) hosts and guests, using the latest and greatest features the VMware vSphere/ESX API has to offer. - Comprehensive, automatic Linux and Windows installation
Seamlessly attach existing Cobbler, FAI, LinuxCOE and/or Opsi environments to your openQRM infrastructure and forget about initial provisioning hassle.
For more details please have a look at the Changelog.
The new openQRM 4.9 release is now freely available under GPLv2 license for download at https://sourceforge.net/projects/openqrm/files/
The project's subversion repository got updated with the 4.9 release code.
Thanks for this release are especially going to the openQRM Enterprise team for sponsoring new features and contributing a lot of development and QA effort. Many thanks go to everybody in the openQRM community, as well, for providing us with useful feedback and bug reports.
Matt Rechenburg
Project Manager openQRM, on behalf of the openQRM Team
Monday, October 25, 2010
Deploying a 100 KVM VM cluster with openQRM Cloud
Just deployed a 100 KVM VM cluster in our openQRM Cloud QA environment via the Visual Infrastructure Designer (screenshot below)
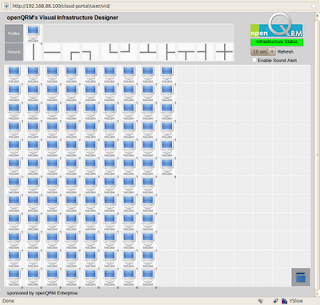
... dragging and dropping VMs in the openQRM Cloud is almost too simple.
(and actually those are 102 nodes)

... dragging and dropping VMs in the openQRM Cloud is almost too simple.
(and actually those are 102 nodes)
Wednesday, October 20, 2010
old video of myself as a professional BMX rider
Just found an old video of myself as a professional BMX rider.
Saturday, September 11, 2010
having fun in Renesse
me, having fun in Renesse (Grevelingen Meer)
gliding ...

turning ...

shifting ...

gliding ...

turning ...

shifting ...

Thursday, January 7, 2010
openQRM 4.6 - Love the new UI Design
Screenshots telling more than words ....

This video provides some details about the new features in openQRM 4.6
Please find screenshots and more details about the tons of new cool functionalities in the new release at :
Enjoy !

This video provides some details about the new features in openQRM 4.6
Please find screenshots and more details about the tons of new cool functionalities in the new release at :
Enjoy !
Wednesday, December 16, 2009
Founded openQRM Enterprise

... and here what Google "says" about openQRM Enterprise.
btw: the "here" link above points to the google-translate engine which then outputs in tss meaning "speak". By clicking on the link Google speaks the sentence given as the parameter.
As reported this is not supported by all browser. ;) works fine here on Linux/Firefox.
Thursday, August 20, 2009
Linux in a browswer within the Amiga Workbench Emulator running in a browser
Here a screenshot of running Linux via JPC within a browser in the Amiga Workbench Emulator which also runs in a browser :

... and lets try to install a Hypervisor within the double embedded Linux in a webbrowser and to run some virtual machines on it LOL.

... and lets try to install a Hypervisor within the double embedded Linux in a webbrowser and to run some virtual machines on it LOL.
Subscribe to:
Posts (Atom)